The Importance of Policy-Based Access Control over API and Microservice Layers
The OWASP API Security Top 10, published in 2023, highlights critical vulnerabilities such as Broken Object Level Authorization and Broken Object Property Level Authorization, emphasizing the risks associated with improper access control mechanisms in APIs. Broken Object Level Authorization allows unauthorized users to access or manipulate objects by exploiting flawed authorization checks, while Broken Object Property Level Authorization occurs when users can manipulate object properties they shouldn’t have access to. Both vulnerabilities can lead to unauthorized data exposure, modification, or loss, underscoring the need for robust authorization checks and minimal data exposure practices.
Broken Object Level Authorization (BOLA) poses significant risks in API security, where attackers exploit inadequate checks to access or modify data they shouldn’t. This flaw allows unauthorized users to manipulate object identifiers, potentially accessing sensitive data or performing unauthorized operations. Ensuring robust user authentication and authorization checks are vital to mitigating these risks. For example, imagine an e-commerce platform where users can view their order history by accessing `/api/order/{orderId}`. Without proper authorization checks, an attacker could change `{orderId}` to access orders belonging to other users, potentially exposing sensitive data.
Broken Object Property Level Authorization (BOPLA) deals with the improper enforcement of access controls on object properties, allowing attackers to view or alter information beyond their privileges. This vulnerability can lead to data breaches or unauthorized changes, underscoring the importance of strict property-level access control mechanisms. For example, consider a social media app where users update their profiles via `/api/user/updateProfile`. If the app fails to restrict which properties can be updated, an attacker might modify properties not intended for user access, like changing their account role from “user” to “admin”.
For deeper insights, it’s recommended to refer to the official OWASP documentation at https://owasp.org/API-Security/
Traditional API protection methods, focusing on perimeter defenses and generic measures, often miss the intricacies of securing APIs against BOLA and BOPLA vulnerabilities. This gap is evident in breaches, with 70% of 2022’s breaches attributed to unauthorized access, demonstrating the limitations of conventional security that are meant to address these sophisticated attack vectors. Such a trend underscores the urgent need for more granular, context-aware API security strategies that mitigate unauthorized access risks effectively.
How Plain Addresses API Security
PlainID’s Dynamic Authorization service provides a robust solution that dynamically adjusts access controls and permissions in real-time, ensuring secure and appropriate access across various resources within an organization’s digital ecosystem. This service empowers organizations to implement fine-grained access policies that respond immediately to changes in user roles, contexts, or actions, enhancing security while supporting compliance and operational efficiency.
Key Components of PlainID’s Dynamic Authorization Service Architecture
PlainID’s architecture is designed to be highly adaptable, ensuring seamless integration with existing IT infrastructures while providing comprehensive access control capabilities.
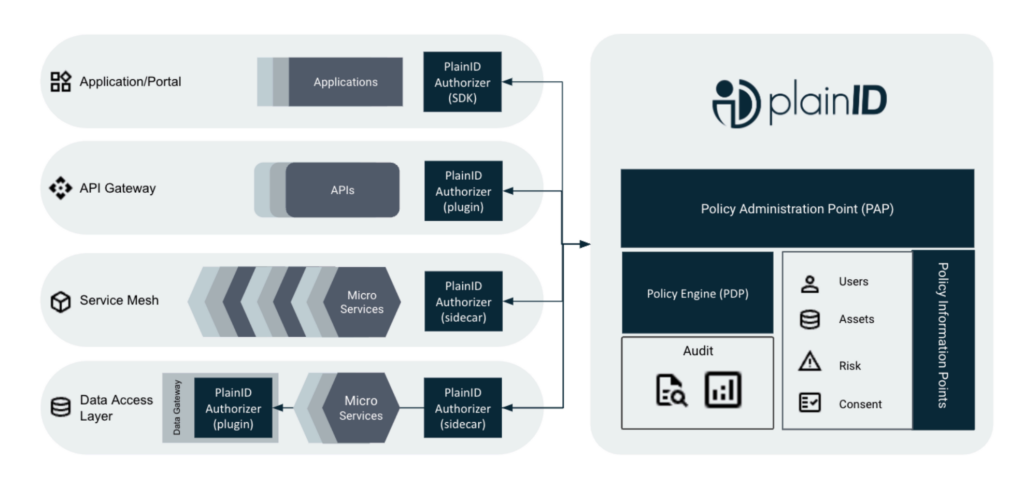
The architecture has several key components:
Policy Decision Point (PDP): The Policy Decision Point is at the heart of the architecture, which is responsible for making real-time authorization decisions. The PDP evaluates access requests against the defined policies, considering the current context and attributes associated with each request.
Policy Administration Point (PAP): The Policy Administration Point provides a centralized interface for creating, managing, and updating access policies. Utilizing a user-friendly graphical interface, the PAP enables technical and non technical stakeholders to define access rules and policies.
Policy Information Point (PIP): This component retrieves relevant attribute data from various sources within the organization’s IT environment. The PIP supplies the PDP with the necessary contextual information and attributes required to make informed authorization decisions.
PlainID Authorizers (PEP): Located at the access request points within the system, the Policy Enforcement Point intercepts access requests and forwards them to the PDP for evaluation. Once a decision is made, the PEP enforces it by granting or denying access based on the PDP’s decision.
PBAC for API and Microservices
PlainID’s methodology in safeguarding against OWASP vulnerabilities, particularly BOLA and BOPLA, is distinguished by its Policy-Based Access Control (PBAC) implementation. This approach is bolstered by deploying Authorizers at both the API and microservices layers of an application’s architecture. Such a design ensures a thorough security measure, spanning across various layers of the digital infrastructure to prevent unauthorized access effectively.
By integrating Authorizers within these critical points, PlainID offers a layered defense strategy. This enhances the security of applications against sophisticated threats and vulnerabilities highlighted by OWASP, ensuring that access controls are precisely applied and managed across different levels of the application stack.
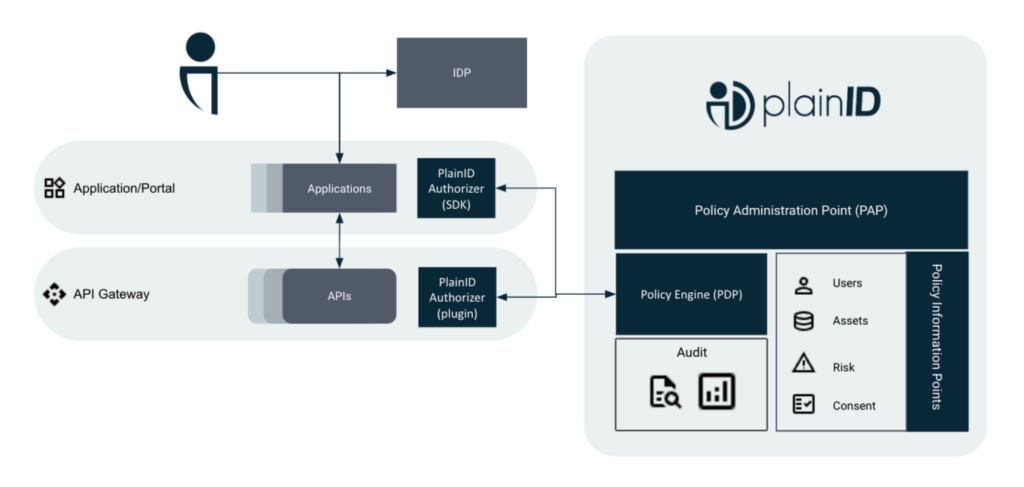
PlainID for API Gateways
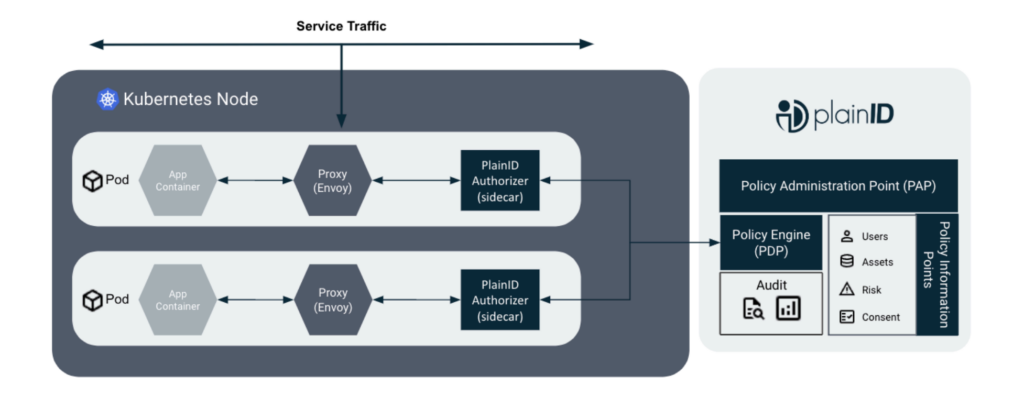
PlainID for Microservices
Policy Administration Point: By leveraging the Policy Administration functionality, PlainID allows organizations to craft policies that directly address vulnerabilities like Broken Object Level Authorization and Broken Object Property Level Authorization. These policies can define precise access controls, specifying which users can access a digital asset and which pieces of the digital asset that person can modify.
Policy Information Point: The Policy Information component plays a crucial role in collecting up-to-date information about users and the digital assets accessed through APIs. This ensures that all access decisions are made based on the latest context, enhancing security.
Policy Decision Point: With the Policy Decision functionality, PlainID evaluates access requests against the defined policies, considering the current information about the user and the digital asset. It makes informed decisions on whether the requester should be allowed to access or modify the digital asset, and which parts of the digital asset can be involved in the change.
API Request Enforcement: Finally, the Authorizer enforces these access decisions, ensuring that only valid and authorized API requests are executed. This mechanism is pivotal in preventing unauthorized access and modifications, directly mitigating the risks highlighted by OWASP.
By integrating these components, PlainID offers a dynamic and robust solution to safeguard against specific OWASP vulnerabilities, ensuring that access to digital assets through APIs is securely managed.
How to Setup and Configure PlainID Components
In this next section, we will go over the steps to mitigate these vulnerabilities with PlainID.
- How to build a policy in PlainID that protects a digital asset
- How to use PlainID building blocks of assets and API mappers to teach PlainID how that digital asset is serviced through various APIs
- How Authorizers work in this specific interaction
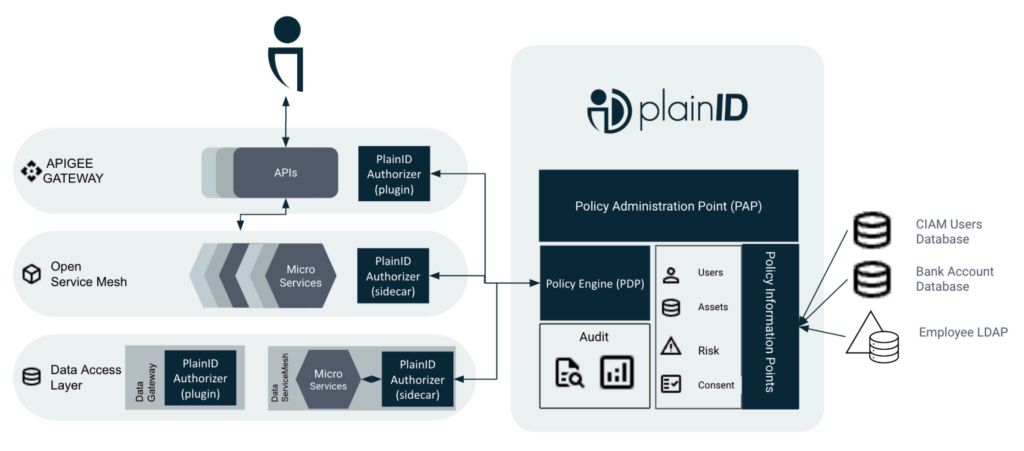
In the sections, we will use a sample use case for protecting retail bank accounts, controlling who can view the balances, and allowing transactions to and from the bank accounts.
See below for the sample architecture:
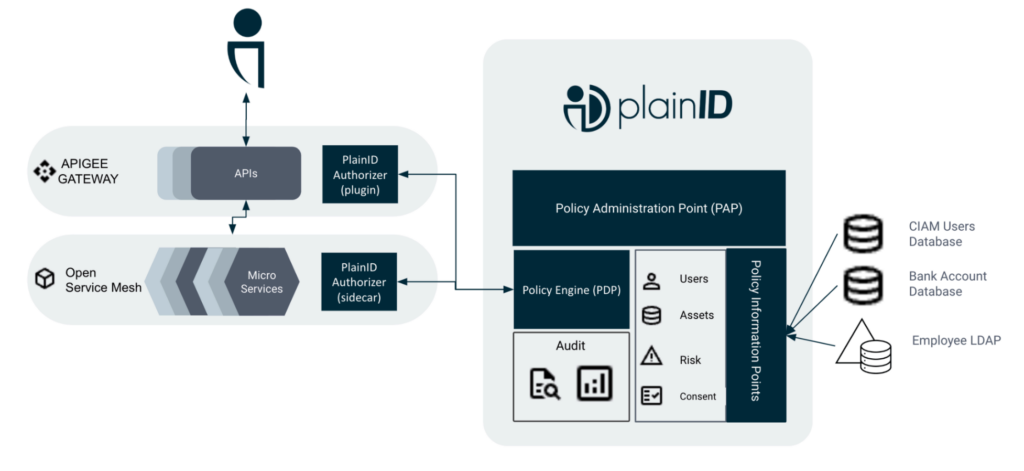
Note: Even though APIGEE and Open Service Mesh are used in this example, PlainID has Authorizers for other
gateways and service meshes.
Our API structures will be as follows.
APIGEE
GET /accounts – Will return all accounts for an end user as well as return all accounts an
employee can see
GET /account/{UID} – Will return back information of that account
POST /transaction
{“from”:{UID},
“to”:{UID}
“Amount”: number
} – Will attempt to transfer money
While this is a very simplistic model, it is appropriate for the purposes of this example. Keep in mind it will not matter to the configuration if the REST endpoints are in the microservice layer or the outer gateway layer.
How to Build a Policy
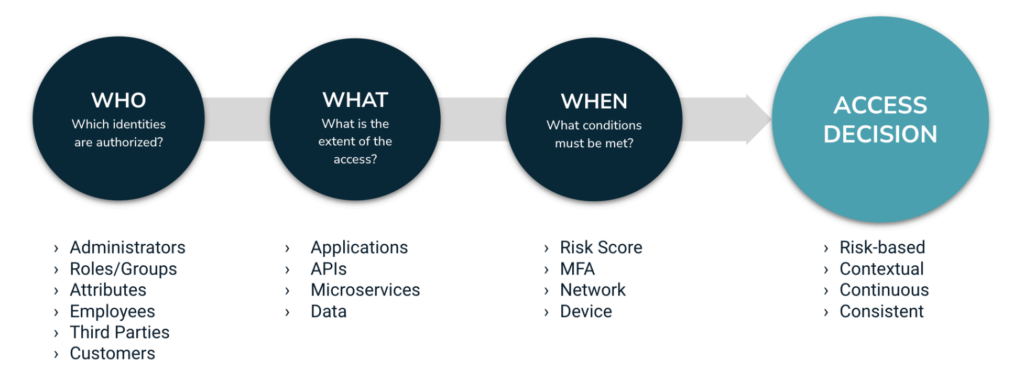
Building a policy in PlainID involves a series of steps designed to tailor access controls precisely to your needs.
- Define the subjects (ie. who) the policy applies to, such as users or groups.
- Specify the actions (ie. what) these subjects can perform such as read, write, or delete.
- Determine the resources (ie. on what assets) these actions can be applied to, such as specific files or databases.
- Set the conditions (ie. when) under which these permissions are valid, potentially including time-based restrictions or context-specific rules.
This structured approach ensures a robust and flexible implementation of access control policies.
In this example, the policy used is represented in plain language as:
- “Customers can view – past transactions and account information on their accounts”
- “Customers can submit transfers originating from their own bank accounts when using a trusted device and when the transfer amount is less than 2000”
For more in-depth information on policy creation and best practices, please see the PlainID Policy Administration guide.
Users (Who)
Contained within each policy is a ‘Who’ section, a place to choose which Dynamic Group this policy will be granted access for. It is important to know that there are no “users” in PlainID when configuring a Dynamic Group. You are configuring a set of logic that will run at runtime to determine if the user attempting an action matches any policy. In the example above we will configure a Dynamic Group of customers.
To determine if a person is a customer we will have the PIP configured to look in the CIAM users database and see if they exist there. It is always the job of the PIP to fetch any and all Identity fabric information from any source, or several sources, and normalize it for the Policy Decision Point to use. For more information on how to configure the identity workspace and the PIP please refer to the official documentation.

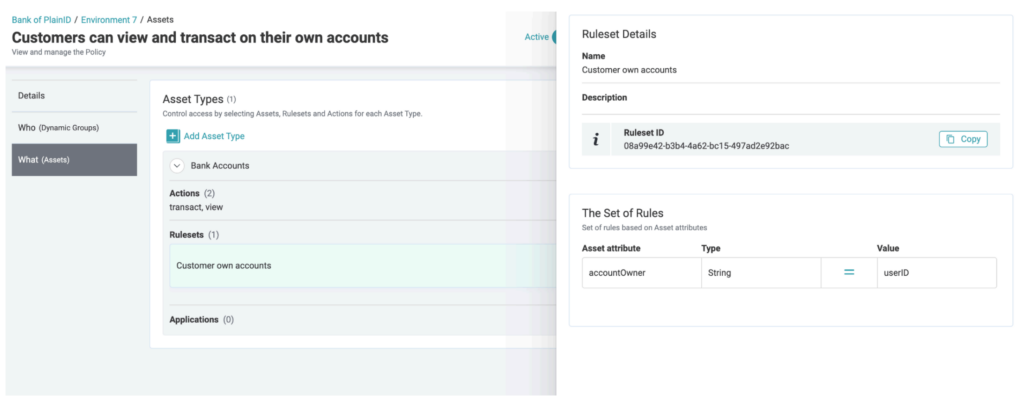
Assets (What)
Contained within each policy is an asset that you are granting access to – this is where the PlainID solution starts to differ from others and why it can solve BOLA and BOPLA. In PlainID, an asset is the actual digital asset you want to protect. While this whitepaper refers to APIs, the API is not the asset.
The asset is the digital record, bank account, insurance claim, or health care record you want to protect. The API is a means of transport you can apply this protection. In the case of configuring the Assets in PlainID, we will be configuring Bank Accounts and connecting the PIP to the Bank Account Database which houses information such as Account Numbers, Current Balances, and Transaction history. For the case of our sample use cases, we will specifically be configuring PlainID to fetch the accountNumber and the Account Owner ID (to make sure the user attempting to view the details of the account actually owns the account).
Connecting the API Structure to the Asset
Now that we have our basic building blocks and have built and tested our policy to see that an end user can view and make transactions against their own bank accounts using the PlainID Policy Simulation tool. Now we connect our API structure to our policy structure. This is done using what PlainID calls API Mappers, Attribute Mapping, and Action Mapping. For more information please see the official documentation.
API Mappers
The first step is to create an API Mapper and map it to the Asset discussed earlier. To do this you just need to describe our API structure to the product.
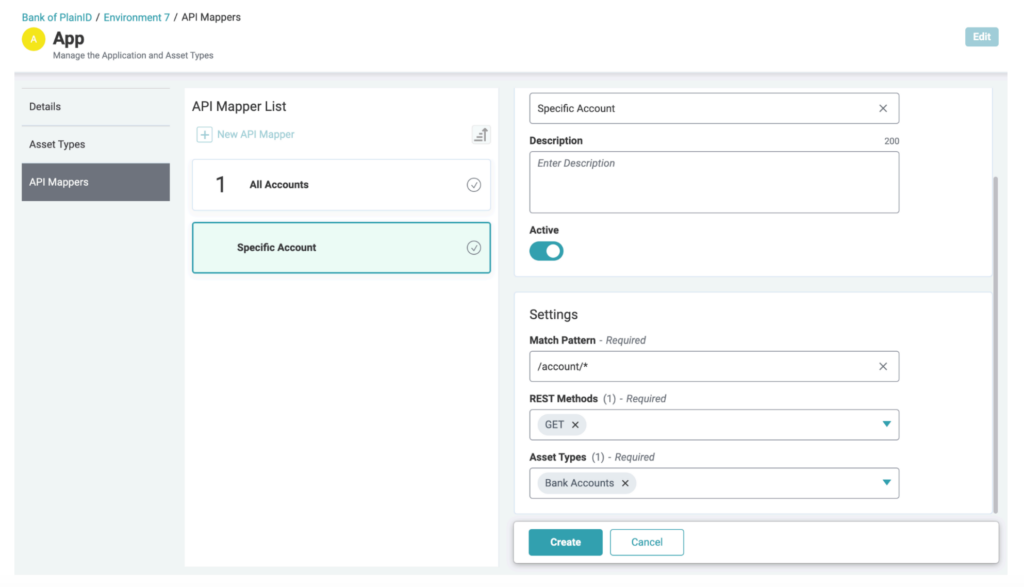
Above we have described the endpoint /account/{UID} to get a specific account’s details. You can see that we used the non-greedy match to only go one level deep to handle the {UID} portion of the endpoint. If you want a greedy match, you could do /account/** which would match anything like /account/{uid}/audit if such an endpoint existed in our example. This is telling the PDP that when the Authorizer, whether it be the outer gateway authorizer or a service mesh authorizer, reaches out and says someone is attempting a REST call for this endpoint the PDP knows that the user is trying to do something with the account’s asset. The whole job of the API Mapper is to map the APIs to the digital assets serviced through them since protection of those assets are the end goal.
Attribute Mappers
The second step is to start using that API mapper to map attributes of the REST call itself to the Assets attributes. For instance, in the /account/{uid} REST call we know that the second part of the URL /{uid} is how we will identify the digital asset the API is trying to serve up to the user. So we need to tell the product that by heading to the Asset Bank Account and finding the attribute we created to represent the bankAccountNumber and map it.

In the screenshot above you can see how we have done that by clicking on the bankAccountNumber Attribute adding an Attribute Mapping Setting then telling the product that the second part of the path will indicate which bank account is being requested.
Now in the case of the transaction API you can see from the description above that the bank account number is actually inside the body. We can cover this by adding a body type mapper.
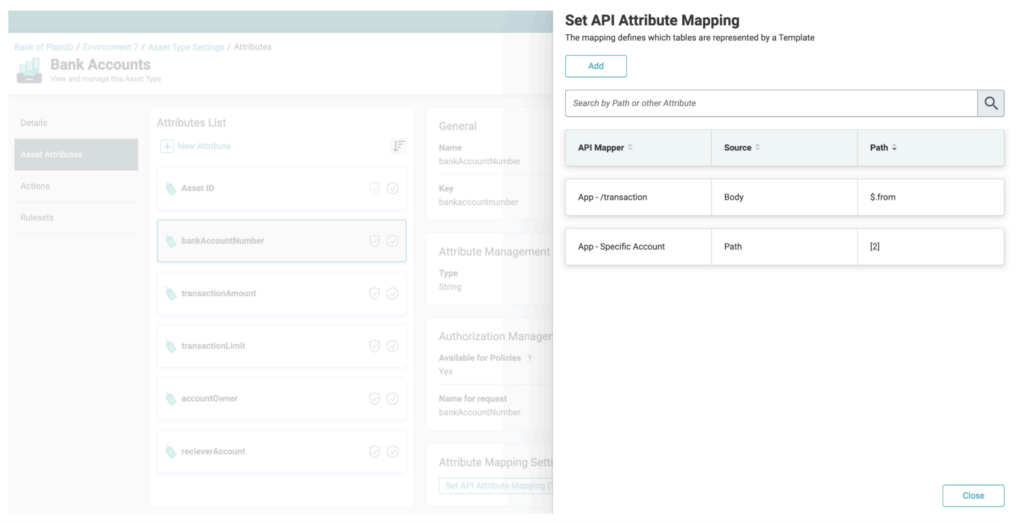
Here we have mapped the ‘Body’ to the REST request body attribute ‘from’. These mappers can use anything in the body, path, header or query string to ensure any and all details that are in the REST call are used appropriately in making an authorization decision.
Action Mapper
The last step for protecting these APIs appropriately is to create an Action Mapper. We need to tell the product that a ‘View’ business action is actually a GET REST verb on an account and a ‘Transact’ action is actually a POST on /transaction. Doing this is similar to the attribute mappers from above. You would go into the actions defined for an Asset and map the REST verb ‘GET’ to the business language “VIEW.”
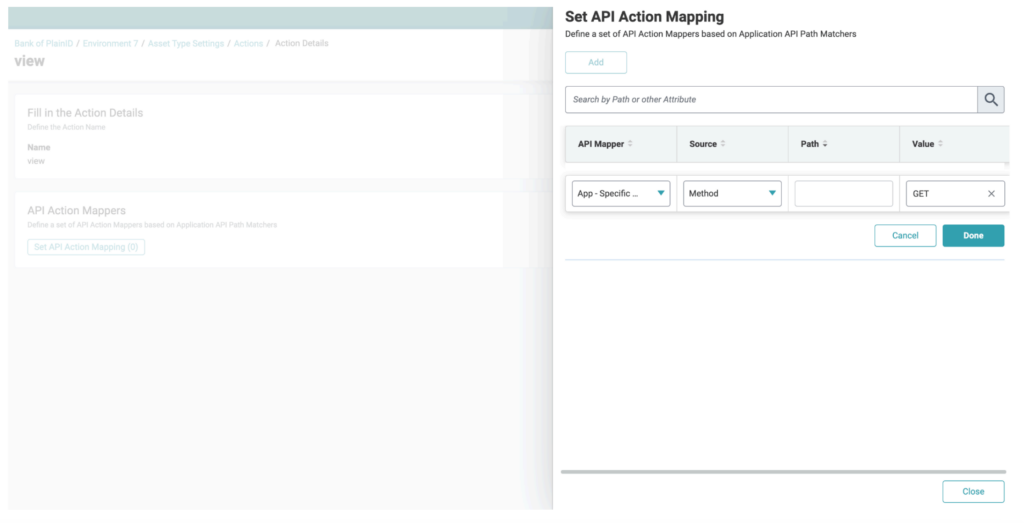
Here we told the product that a ‘View’ is really the REST method GET accounts for the /account/{UID} endpoint.
Data Access Control
Thus far we have been able to protect every API endpoint in our example except one: the /accounts that returns back all accounts a user has access to. Now this endpoint might be used to return back all information from all accounts, or it might be used internally like in an employee application to allow employees to help end users. In our use case we will use it to return all accounts that a user has any type of authorization over. The tricky part with endpoints like this is that there is no UID that can be associated with a specific bank account. It’s just an endpoint that shows me what I am supposed to see.
However, we still need to be able to lock down this endpoint and make sure that it only returns the data that the requesting user is allowed to view per policy. Fortunately we already have the policy we want. We just need to add another authorizer to our architecture.
PlainID for Data Access Layers
PlainID also covers enforcing policies in the data access layers as well. This comes in two main flavors: a plugin that directly goes into a Commercial off the off-the-shelf data access layer tool such as Trino, Denodo, Starburst as well as a SQL rewriter microservice. While these are not the main focus of this example they are still important to note due to their ability to enforce authorization on “return all” endpoints such as the /accounts endpoint. In this example let’s go with the worst-case scenario and say that the /accounts endpoint triggers a microservice that does ‘select * on bankAccounts’. Now, obviously no one would really use that in production.
That SQL statement would then go to the Trino or Starburst data access layer. The PlainID Authorizer would get initiated and see that it is a customer trying to access all of their bank accounts. PlainID can now enforce the same policies from above by the requested SQL command to ‘select * on bankAccounts where accountOwner = 987234987’ (the requesting user’s accountID) this will ensure that only data the end user is allowed to see is returned from the database.
Conclusion
PlainID’s Dynamic Authorization Service, consisting of Policy Decision Points, Policy Information Points, Authorizers, and API Mappers within a Policy-Based Access Control framework, offers a sophisticated solution to address OWASP vulnerabilities like Broken Object Level Authorization and Broken Object Property Level Authorization. By leveraging real-time data and policy-driven decision making, PlainID ensures that only authorized requests are permitted, effectively mitigating the risks identified by OWASP and enhancing the security posture across API and microservice architectures. This significantly enhances an organization’s identity security posture and closes large gaps in cybersecurity by ensuring granular, real-time authorization decisions, which protect against unauthorized access and data breaches.